
Do you wanna know about the Random Forest Algorithm?. If yes, then you are in the right place. Here I will discuss What is the Random Forest Algorithm?, How Random Forest Algorithm works?, and How to implement the Random Forest Algorithm in Python?. So, give your few minutes to this article in order to get all the details regarding the Random Forest Algorithm.
Hello, & Welcome!
In this blog, I am gonna tell you-
Random Forest Algorithm
So, let’s start with the definition of the Random Forest Algorithm.
What is a Random Forest Algorithm in Machine Learning?
The Random Forest Algorithm is the most popular and powerful supervised machine learning algorithm. Random Forest Algorithm is capable of performing both Regression and Classification tasks.
As the name suggests, “Random Forest“, this algorithm creates a Forest with a number of Decision Trees.
In general, the more trees in the forest, the more robust the prediction, and thus higher accuracy.
Random Forest Algorithm use multiple decision trees to make a forest.
The method used for creating a Decision Tree is the same as used for constructing a Single Decision Tree. The information gain and entropy are calculated for creating a Decision Tree.
If you don’t know how to create a Decision Tree. Then read this article- Decision Tree in Machine Learning: A Complete Guide with Example.
Random Forest Algorithm is an Ensemble Learning.
Now, you are thinking What is Ensemble Learning?
Right?.
So, no worries… I will explain to you about Ensemble Learning.
To understand How Random Forest Algorithm works, you should know first, What is Ensemble Learning?.
Let’s see about Ensemble Learning.
What is Ensemble Learning?
Ensemble means combining multiple models. That means, in ensemble learning, we combine multiple models and then perform classification or prediction.
Now, you are thinking, What is the need or benefit of Ensemble Learning?.
So, I will give you an answer with the help of an example. Suppose you are confused about choosing any course. You are confused to take this course or not.

So, What you can do?.
You can ask your friend for suggestions?.
But, is his/her suggestion enough for you to choose an appropriate course?. I think No.
So, What you can do else?.
You can ask multiple people, like your teachers, parents, more friends, relatives, or anyone else.
Now, what will happen?
You have more suggestions… Right?.
So, when you have more suggestions, then how to make a final decision to choose the course or not.
The answer is Majority Voting.
When you asked suggestions from multiple people. Some people said, “yes, choose this course”. And some said, “No, Don’t choose this course”.
Suppose the majority of people said, “Yes, Choose this course”. So, you finally make a decision about choosing a course.
So, what happened here?.
The decision you made after asking multiple people is much accurate than asking from one person.
Similarly, Ensemble Learning combines multiple models. Train these models on training data. And then use the prediction of all models to make the final output.
Ensemble Learning doesn’t depend on a single model.
This feature of Ensemble Learning makes it more accurate. Because its result is not dependent on one model.
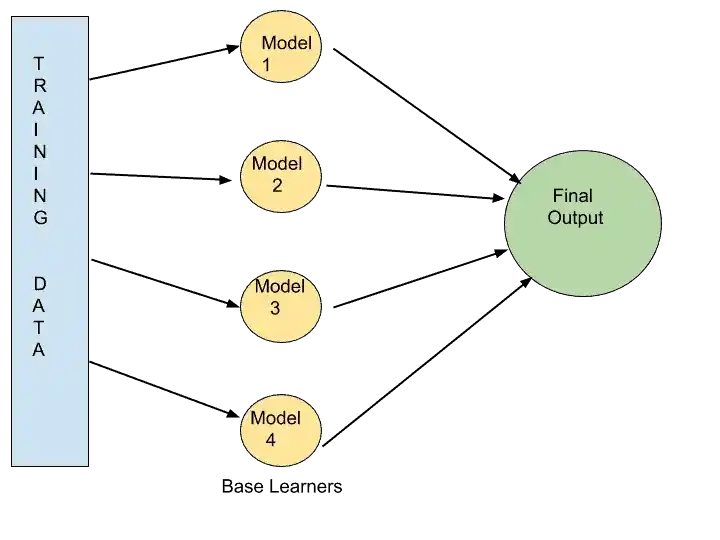
As you can see in that image, these Models 1, 2, 3, and 4 are taking data from the training data.
And these models are not a single algorithm. Model 1 can be SVM, Model 2 can be the Naive Bayes algorithm, Model 3 can be Decision Tree Algorithm, and Model 4 can be KNN.
All the base learners are using different algorithms, and this situation is known as Heterogeneous Situation or Heterogeneous Ensembles.
A single base learner is a weak learner. But, when we combine all these weak learners, they become strong learners. They become strong learners, because their predictive power, accuracy, precision are high. And the error rate is less.
I hope, now you understood completely about Ensemble Learning.
In Ensemble Learning, we have two techniques-
- Bagging or Bootstrap Aggregation.
- Boosting.
In Bagging, one of the techniques is Random Forest. As we discussed, Random Forest uses multiple decision Trees.
Before moving into Random Forest, first, let’s see what is bagging?. And how bagging works?.
Bagging in Ensemble Learning.
Bagging is the technique of Ensemble Learning. It is also known as Bootstrap Aggregation.
To understand Bagging, just have a look at this image.
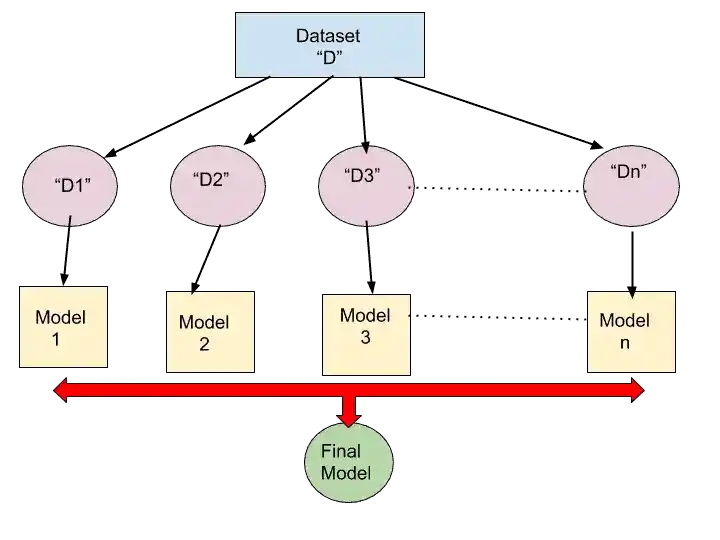
In that image, There is Dataset “D”. This is our original training dataset.
So, what we do in bagging is, we randomly select some data from training dataset D, and make Boostrap Dataset D1.
Similarly again, we take some random dataset from our Training dataset and make new dataset D2.
In the same way, we make new Dataset D3, D4…Dn.
So, we can make a new Bootstrap Dataset with random selection and with replacement.
What is mean by “with replacement”?.
“With replacement” means some records may be present in more than one Dataset. It may be in D1 and D2.
Let me simplify it.
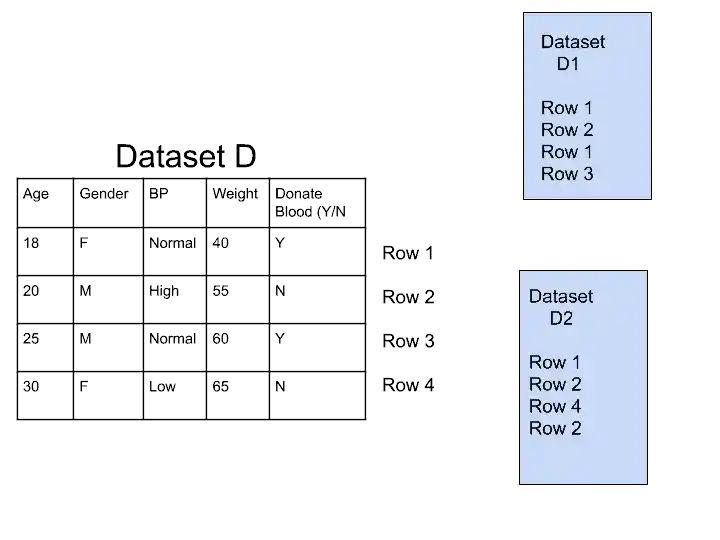
In that image, we have randomly created two Datasets D1 and D2.
As you can see, in dataset D1, we randomly select Row 1, Row 2, and again randomly we select Row 1, and then Row 3.
Similarly in Dataset 2, we randomly select Row 1, Row 2, Row 4, and again Row 2.
So, “with replacement” means, in Dataset 1 and in Dataset 2, we have repeated values. Row 1 and Row 2 is present in both datasets D1 and D2.
This is also known as “Row Replacement“. That means multiple copies of one row may be present in multiple datasets.
I hope now you understood “with replacement“.
So, according to the first image of Bagging, we have multiple datasets D1, D2, D3…Dn. And it is known as Bootstrap samples.
Now, you may be thinking-
Why we generate these multiple datasets?
So, we generate these multiple datasets to train our models. For example, in bagging image, you can see, we use the D1 dataset to train our Model 1.
Similarly, the D2 dataset is used for training Model 2.
In short, we train different models with different datasets. Not with the same dataset.
When all these models are trained, then we combine these models to create a new model. And that model is our Final Ensemble Model.
This final ensemble model is a strong model. Because it has high accuracy, precision, and predictive power. And it has a minimum error rate.
The result of this final ensemble model has much accurate than Model 1 or Model 2. Why?.
Because the final ensemble model is the combination of all these models.
Once the final ensemble model is created, and you have to know to classify something.
In simple words, for example, you have to know Whether a person should donate blood or not?. Its a kind of Binary Classification.
Alright?
So, how Bagging can perform Classification.
It will give that Test Data to all models, and ask, tell me, ” Person should donate blood or not?”
And these model tell their opinions in Yes and No form. After getting all opinions from models, the final model performs majority voting.
If most of the model said Yes., So the final ensemble model give result as Yes.
I hope, now you understood everything related to Ensemble Learning and Bagging.
Right?.
Now, let’s see How Random Forest Algorithm Works?.
How does the Random Forest Algorithm Works?
Random Forest works in the same manner as Bagging does.
But,
There is only one difference between Random Forest and Bagging. And that is-
In Bagging, models can use any algorithms. Suppose Model 1 can use the Naive Bayes Algorithm, Model 2 can use the Support Vector Machine, Model 3 can use any other algorithm. In short, there are no restrictions for using any algorithms for any model.
But,
In Random Forest, all the models use only the Decision Tree Algorithm. That means, all the base learners or models use the Decision Tree Algorithm to train the model.
That’s why it is called as Random Forests. It creates forest with multiple trees, and that is Decision Tree Algorithms.
There is one more difference between Bagging and Random Forest.
In bagging, we only perform “Row Sampling with Replacement“. Right?
But,
In Random Forest, we also perform “Column/Feature Sampling with Replacement”. That means we can choose any column or reject any column from the original training dataset.
As we were choosing rows randomly in Bagging, same thing we can do with columns or features in Random Forest.
So, these are the two differences between Random Forest and Bagging.
Now let’s see step by step, How random Forest works?.
Random Forest Work Procedure: Step by Step Approach
Step 1-
The first step is creating Bootrap Datasets from Original Dataset. The bootstrap dataset is randomly selected dataset, in which we perform Feature/Column Sampling with Replacement. or Row Sampling with Replacement.
Suppose, We have created this Bootstrap data from our Original Dataset. Here some rows are used more than one time. And some rows are not used. This is all happened randomly. That’ why it is called Random Forest.

Step 2-
Once, we create all bootstrap datasets in the same manner as we did in step 1. It’s time to create a Decision Tree.
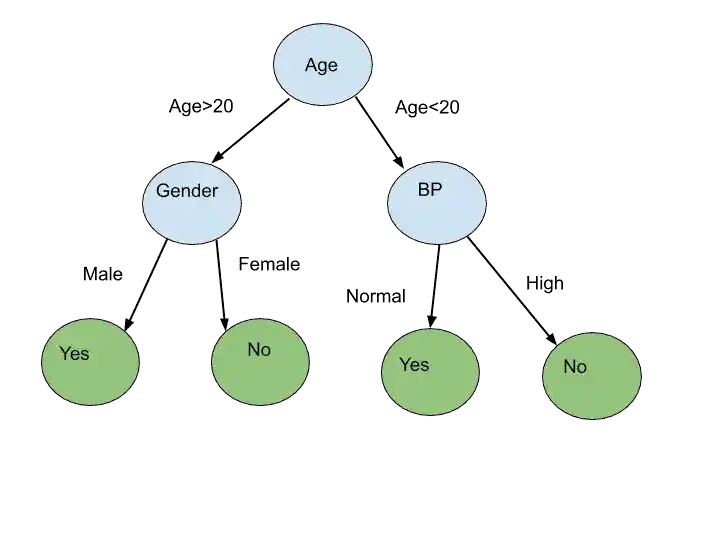
So by using Dataset 1, we can create Decision Tree 1. Suppose in that Dataset, we have four features- Age, Gender, BP, and Weight. It’s not compulsory to use all features. We can randomly select any features and make a Decision Tree.
Like in normal Decision Tree, we consider all features for choosing as a Root Node. Right?.
But, here, we can choose only two features, and calculate information gain and entropy of only these two features. These are randomly chosen features.
Got it?.
Suppose, we have chosen Age and Gender features. And we calculate the information gain and entropy of only Age and Gender. And choose one as a Root Node. Assume Age has high information gain, so we make Age as Root Node.
Similarly for choosing the next node, we randomly choose any features (not all) and calculate information gain and entropy.
Suppose by choosing Age, Gender, and BP features, we have created this Decision Tree.
In the same way, we can create multiple Decision Tree by randomly choosing any Features.
Step 3-
After creating multiple decision trees, its time to train all decision trees with Boostrap Dataset.
As you can see in that image, multiple Decision trees are trained with their respective Bootstrap dataset.
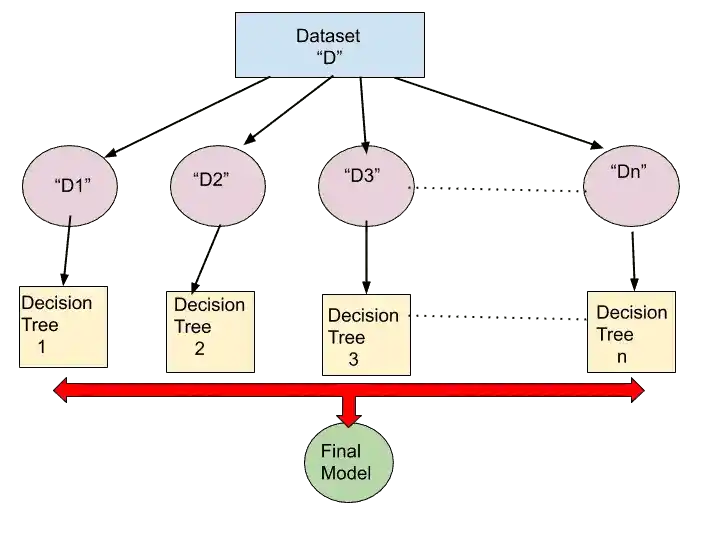
Step 4-
Once all the model has been trained, its time to perform Testing.
Suppose we give this dataset to the final ensemble model, and tell the model to predict, “Person should donate blood or not?”
| Age | Gender | BP | Weight | Donate Blood(Y/N) |
| 45 | M | Normal | 65 | ? |
So, the Random Forest algorithm will give this test set to every decision tree. And ask them to predict.
All these Decision Trees predict in Yes or No form.
Step 5-
Once all the decision trees have predicted, the random forest algorithm perform majority voting.
As you can see in that image, three Decision Trees said “Yes”. And only one Decision Tree said, “No”. So the majority is in “Yes”.
That’s why the final result is “Yes”.
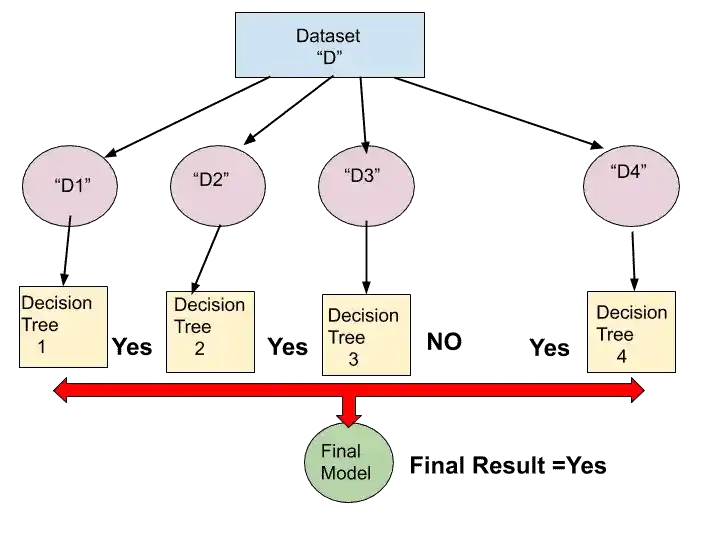
This Final Result is more accurate than any single Decision Tree Result.
So, this is the whole procedure of the Random Forest Algorithm. I hope you understood easily.
Now, let’s see how you can implement this algorithm in Python.
Implementation of Random Forest Algorithm in Python
Here I am using Social-Network Ad Dataset, you can download the dataset from here. This dataset contains information of 400 customer of car dealership. And we have to predict which customer buys the most SUVs.
To implement Random Forest, the very first step in python is
Import all Libraries
import numpy as np
import matplotlib.pyplot as plt
import pandas as pd
The next step is-
Load the Dataset
dataset = pd.read_csv('file_name.csv')
X = dataset.iloc[:, [2, 3]].values
y = dataset.iloc[:, 4].values
Here, I have created two entities X and Y.
where X is metrics of features. And Y is the Dependent variable vector.
Metrics of feature or X are the values or attributes by which we predict or categorized. Y is the predicted value.
Let me simplify it.
In Blood Donation Example, Age, Gender, BP, and Weights are X or metrics of features. Whereas “Donate Blood (y/N)” is the Y or Dependent variable vector. we have to predict its value.
I hope now it is cleared to you.
Now the next step is-
Split the Dataset into a Training set and Testing Set
from sklearn.model_selection import train_test_split
X_train, X_test, y_train, y_test = train_test_split(X, y, test_size = 0.2, random_state = 0)
We split our dataset into four variables- X_Train, X_Test, Y_Train, and Y_test.
train_test_split is a function that split our data into training and testing.
Here, we split 80% of data into Training Set, and 20% data into Test set.
After splitting the dataset, the next step is-
Perform Feature Scaling
from sklearn.preprocessing import StandardScaler
fs = StandardScaler()
X_train = fs.fit_transform(X_train)
X_test = fs.transform(X_test)
We perform feature scaling because all the variables are not on the same scale. And it can cause some issues in your Machine Learning Model.
That’s why scaling is necessary to convert all values under the same range or scale.
We scale only the X variables.
Once the features are scaled, the next step is-
Fit Random Forest Classification to the Training set
from sklearn.ensemble import RandomForestClassifier
rf = RandomForestClassifier(n_estimators = 100, criterion = 'entropy')
rf.fit(X_train, y_train)
Here, we imported the RandomForestClassifier class. And inside RandomForestClassifier class, we only need to pass two values n_estimators and criterion.
n_estimators are the number of decision trees you want to create. Suppose here, we created 100 decision trees. That’s why 100 is written in the n_estimator value.
The criterion is the criteria for splitting the decision tree. So we have chosen “entropy” in criterion.
Once the model has been trained, the next step is-
Predict the Test set results
y_predict = classifier.predict(X_test)And this is the last step. After performing this step, you will get your results.
You can check the accuracy of your model by creating a Confusion Matrix.
Check the accuracy of Model by Confusion Matrix
For creating a confusion matrix, you need to write these two lines of code.
from sklearn.metrics import confusion_matrix
cm = confusion_matrix(y_test, y_predict)
So, this is all about the implementation of the Random Forest Algorithm in Python.
Now, its time to wrap up.
Conclusion
In this article, you learned everything related to the Random Forest Algorithm in Machine Learning.
Specifically, you learned-
- What is the Random Forest Algorithm and how it works?
- What is Ensemble Learning and Bagging with a super-easy example?
- How to implement the Random Forest Algorithm in Python?
I tried to make this article simple and easy for you. But still, if you have any doubt, feel free to ask me in the comment section. I will do my best to clear your doubt.
All the Best!
FAQ
Learn the Basics of Machine Learning Here
Are you ML Beginner and confused, from where to start ML, then read my BLOG – How do I learn Machine Learning?
If you are looking for Machine Learning Algorithms, then read my Blog – Top 5 Machine Learning Algorithm.
If you are wondering about Machine Learning, read this Blog- What is Machine Learning?
Thank YOU!
Though of the Day…
‘ Anyone who stops learning is old, whether at twenty or eighty. Anyone who keeps learning stays young.
– Henry Ford

Written By Aqsa Zafar
Aqsa Zafar is a Ph.D. scholar in Machine Learning at Dayananda Sagar University, specializing in Natural Language Processing and Deep Learning. She has published research in AI applications for mental health and actively shares insights on data science, machine learning, and generative AI through MLTUT. With a strong background in computer science (B.Tech and M.Tech), Aqsa combines academic expertise with practical experience to help learners and professionals understand and apply AI in real-world scenarios.

Thanks a lot very much for the high quality and results-oriented help. I won’t think twice to endorse your blog post to anybody who wants and needs support about this area.
Thanks!